Showing posts with label Literacy. Show all posts

September 4, 2013

Wow Us Wednesday ~ Lesson Plan Link Party!

We have a brilliant idea if we do say so ourselves....

Well, it will only be brilliant if YOU join in! There are so may smart therapists and teachers out there that work so hard to create purposeful and engaging lesson plans for students. I know I am guilty of re-inventing the wheel too many times instead of reaching out to ask for and share ideas with my fellow teachers.

So, let's change that!

On the first Wednesday of each month, we will open up our Wow Us Wednesday Lesson Plan Link Party. We will keep the links open from Wednesday-Tuesday, so check back several times over the course of the week to catch all the great ideas. Feel free to link up any great lesson plans that you would like to share and make sure to "like" the ideas that you really enjoy. We will feature the top three "liked" lessons in a follow-up post.

What's a link party you say? It is a great way to be linked up to other blogs and share information in one easy stop. But Kelley & Orlanda, what if I want to share and I don't have a blog? Never fear ~ the Dynamic Duo is here! There is a way you can share your idea. Just follow the instructions here.

I'll start the party off with a lesson plan that I find to be incredibly useful with my 5th grade social groups. I think it would be a fantastic lesson to use with middle and high school as well.


One of my tried-and-true activities that I do yearly with my 5th grade social group students is designing our own vision boards. A vision board is a tool that helps students identify what they want various aspects of their life to "look like" in the future.


If we already have rapport established in a group that has been together for a while, then we do this activity at the beginning of the school year. If the group is composed of students who do not know each other well, then we do this activity after we've had time to do some team building.

The first step is to create a web that describes the important components of a balanced life. Here is an example of our web.


The kids then cut out pictures of magazines or find images on the computer to represent their short term and long term goals for each of the areas on the web. This really opens up a lot of discussion and even helps some members find commonalities between each other.

They create their own vision boards and present it to the group. Here are a couple of examples of finished vision boards by 5th graders.


We use these vision boards all year as anchors for discussions about how our social behavioral choices either support or harm our ability to reach our goals.

I hope this activity will be good to add for your beginning of the year planning!   ~Kelley


Here are the friendly guidelines for our get-together:
  •  
  • When you link up, please grab our button and include it somewhere in your post. You can find it on the sidebar. Or you can simply link to this post on your blog. Thanks!
  • Please visit the other great bloggers that link up to check out their ideas and leave some comment love.
  • Please consider joining the Dynamic Duo as a blog friend. Follow us by email (on the sidebar) or through your blog reader. That way you can make sure to get the most up-to-date posts.
So, get an awesome lesson plan ready to post and join the party!


May 13, 2013

Fun Ways To Develop Keyboarding Skills This Summer!

I have several families who have asked about increasing their child's familiarity with letter location on a computer keyboard. Typically before having a child do more of their writing on the classroom computer or considering assistive technology options for fine motor/handwriting difficulties, it is important for students to be familiar with the keyboard and be able to quickly locate keys. Hunting and pecking is fine, but needs to be able to be done pretty quickly in order for it to be a help and not a hindrance for students.

I've encouraged the families for whom I would like to consider assistive technology for their child next year to have their child practice keyboarding using fun, free online games this summer and to practice keyboarding by emailing a friend or relative this summer.

If you have students who need keyboarding practice, here is a list of great (free!) online resources for keyboarding games:

 This site has excellent instruction as well as games. The section under "courses" is unfortunately dull, but good to do if you can get your child to work on it for 5 minutes or so. The section under "games" is fun and good practice. 


I hope this will save you some research time if you have students who need keyboarding practice. Here's to counting down the days 'til summer! ~ Kelley


March 2, 2013

Feelings and Emotions ~ Literacy, Language and Social Communication Activities ~by Orlanda

Whew! It's been a while since I have posted, but Kelley and I have been working HARD in our speech and special education classrooms and trying to balance work life and home life! We have spent the last few weeks with a focus on FEELINGS and EMOTIONS with many of our students. We have been using the Emotions Cue Card created by Kelley in all of our sessions to help our students identify their own emotions at the beginning of each social group session. We have found that some of our students have difficulty describing their own emotional state, so we talk about it every week!

Kelley and I work together with a wide variety of students with language, social communication and social behavioral needs and this topic is ongoing for all of these students. In addition, I work with many students with language impairments that have difficulty describing feelings as it relates to others or characters in stories that are read and heard as well as in their own oral and written expression. So, in addition to the groups that we teach together, I have been working on this skill with ALL of my groups. I even managed to incorporate many articulation goals with this lesson, here's how I did it....

We started in our social groups and speech/language groups reading these stories:


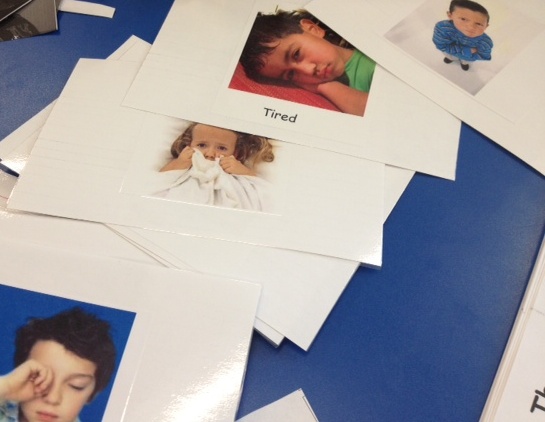
The Way I Feel was great with ALL of our young age groups (3 year olds-2nd grade students). It was easy to modify the language throughout the story and match emotions pictures. Today I Feel Silly & Other Moods That Make My Day was was great for students Kindergarten through 2nd grade because it had more words and more details in the pictures throughout the story. How Are You Peeling? Foods with Moods was a little too "abstract" for my younger students to recognize the feelings or emotions depicted in the photos, but it was great for my 1st and 2nd grade students. While we read each of these books, we had the Emotions Cue Card handy to match feelings from the book to the photos on the cue card. Additionally, I collected many other Emotions Photos to match feelings and emotions throughout these stories. Several of our students have difficulty understanding and seeing that people depict similar emotions in slightly different ways, so we wanted to offer a variety "faces" for our students to help them see and understand the similarities/differences between faces and feelings. Here is one page of the Emotions Photos that I used for my students to match and describe emotions.


This Emotions Photos document is 4 pages of photos depicting Happy, Sad, Mad/Frustrated, Calm, Scared and Tired. You can grab it here. I turned these photos into cards by cutting the pictures out and laminating them onto large index cards.


While reading all of the Feelings books, we targeted goals such as Answering Basic Questions, Describing details in pictures and using Inference to determine the character's feelings. Each time we read the books, we used the Emotions Photos to match the feelings of the characters. For students in articulation therapy, we continued to use these books and activities and were able to focus on phonemes such as /f, s, sm, sk, l/ to name a few.

After reading each of the stories (over 2-3 sessions), we started making our own book of feelings. With our young kindergarten group, we have several students with low receptive/expressive language skills and poor social communication skills. In this group, we have targeted each emotion in our own book in 1-2 sessions. We started each "emotion exploration" using a computer software program called Faceland.


We LOVE this program because it teaches the students what "clues" to look for on faces to determine the emotion. Each new emotion that is taught is broken into 2-3 facial cues from the eyebrows/forehead, eyes, and mouth. This program also allows the students to see the same emotion depicted in slightly different ways between different people. There are also questions that it asks, and the students have to match the situation to the emotion. For our young students, we often have to act/draw out these questions to help them understand; however, it really helps them learn the feelings. There are even follow up games that go along with each emotion, so it is very engaging!

After going through Faceland, we started making our own book called "My Book of Feelings". Here are some sample pages from this book:


We took pictures of our students depicting the emotion that was stated on each page. This was easiest to do during our Faceland activities for some of our students. Others just needed the Emotions Cue Card or Emotion Photos and a mirror to match their own faces to the feelings. Some students enjoyed taking their picture using the iPad with the camera in "reverse" mode so that they could see themselves making the faces. Still, some of our youngest students (3 year olds) had a hard time making the faces that they were not feeling in the moment, so we improvised by using other pictures or catching them in the act! Needless to say, this was one of the most fun parts of the activity, and all of our students LOVE seeing pictures of themselves in their own books! Here is how one turned out!


Our students with expressive language impairments had some difficulty independently coming up with "things that make me feel ___" so I created a document with pictures for the kids to choose from. A sample of this document is pictured, but you can grab the entire document HERE.


We also found that different students had different feelings about the pictures offered. For example, one of our students feels HAPPY when tying her shoes but another said that this made him feel FRUSTRATED because it was hard for him.

For our youngegst students, we also used the Emotions Photos cards to discuss Similarities and Differences and the "I Feel __ When" cards to Categorize emotions. For our older students in speech/language therapy, we continued expanding this lesson by coming up with synonyms for the feeling words and using them to re-tell or create stories of our own. In their Book of Feelings, we made it harder by having them expand their own stories with their personal experiences.

This has been a great activity for ALL of our students. We have had the opportunity to learn so much about them and they have really improved their ability to describe their feelings and the feelings of others. AND, they will be able to share their books with their families for ongoing conversations at home!

We hope you find these activities useful with the speech, language, and social communication needs of your students! We'd love to know How You Feel about these activities and how we can make them even better!

   ~~Orlanda

December 11, 2012

Simple Speech ~ "The Gingerbread Man" : Activities to Target Speech, Language and Literacy

Wow! This semester in school is flying by, we only have 7 more days until Winter Break! I feel like I have been drowning in paperwork and evaluations and my student caseload keeps growing! Thankfully, we are in one of my favorite times of year, the Holiday Season!

Because I work with such a diverse population of students and cultural backgrounds, I really have to focus on choosing diverse activities that allow us to celebrate the season in many different ways. My favorite book to read this time of year is "The Gingerbread Man". It's a fun story about something that we all enjoy: COOKIES! This year, I have collected MANY versions of this story to enjoy with my students!


The goals that I target during these activities include the following:
Articulation/phonology: multi-syllable words/phrases; final consonants; phonemes: "dge", /f/, /k/
Receptive language: Recognizing animals, actions, positions
Expressive Language:  Core Vocabulary--"In, Out, Go, Run, He, She, They"; Answer Who, What Doing, Where and Why Questions; Problem solving; Inference; Predicting; Story Grammar; Sequence; Re-telling stories, Compare/Contrast
Pragmatic Language: Feelings/emotions, Non-literal language/Metaphors ("Sly as a Fox")

I started by reading this version: "The Gingerbread Man". In this version, the fox tricks the gingerbread man by telling him, "Come closer, I can't hear you". The kids love this one because we all YELL together like the gingerbread man, "I have run away from . . . .!" and then we list all of the characters.


Then I read this version of the book:

I talked to the students about "folk tales" and why there are different versions of this story. The second version of the story has more details about the process for making gingerbread and has new vocabulary like "sugary glaze". This version also has different characters from the first version of the story.

While reading each story, we focused on the articulation and phonology goals using the repetitive text "Run, Run as fast as you can, you can't catch me, I'm the gingerbread man!" Then, after reading each story (usually during the second session), we retold the story using this visual that I created: Retell the Story. This is a great tool that we used to identify the Story Parts and practice Sequence skills. This is also helpful for identifying details and events from the a story.

After retelling each version of the story. We were worked on compare/contrast of the stories. I use a simple Venn diagram to compare/contrast the stories. I found a new idea on how to do this on Pinterest using paper plates. What a great idea! Here is the link to the post: Paper Plate Venn Diagrams


The kids have been so engaged that I sought out many more versions of this story and have them laid out. They ask every day which book we will read next! So, we also read these stories and completed the same kinds of activities. Here they are:


The kids have done such a great job and have been really engaged in pointing out similarities and differences while we have read the books. I have been using these activities with Pre-K through 2nd grade students. I even used the first version of this story in my youngest pre-school group. I found lots of Gingerbread Man activities on various websites, here are some of my favorites!

Sequence pictures and a mini book:

Gingerbread Man themed games and websites:

YouTube Links for Gingerbread Man story and How to Make Gingerbread cookies:

I really like the video "Gingerbread Men Recipe Demonstration". It's kind of long, so I fast-forwarded many parts, but it was great for my students to see the process for making gingerbread cookies. Many of them thought that decorating and eating were the only steps! The last activity that I did with the kids was to make cookies with them. I had them list the steps for making the cookies and I purchased some Gingerbread Cookie Mix. We did this hands on activity to complete the recipe, bake the cookies, decorate, and EAT (everyone's favorite).

If you have students with diet restrictions or have limitations in making real cookies, we also had lots of fun using the Cookie Doodle app on the iPad. Using this app, you and your students can walk through the steps of mixing the ingredients, baking, and decorating. It's fun, too!


I hope you have fun using some of these Simple Speech "holiday themed" activities with your students! What are your favorite books or activities to use during the holiday season?

~Orlanda

October 22, 2012

"Halloween" Themed Books AND Core Vocabulary!

 
Halloween is one of my favorite holidays and it lends itself to so many great activities for speech and language learning and functional communication use. I have been working with several teachers (including my parnter, Kelley) to spread CORE vocabulary into many classrooms, and this week I have found a few books to help me combine these two FUN concepts.
 
The first story I used came from an OLD book, "Storytime: Holiday Fun" by Pati King-DeBaun (1993). The story I pulled from this book is called "Stirring the Brew". I have had this tool in my "toolbox" since my first year as an SLP (I actually found a note attached from my CF supervisor!--Thanks, Penny!) Unfortunately this book is now out of print, so I couldn't find it to share. I DID find a photo of it online though! Here it is:


The concept of this story is simple and REPETITIVE. Each page turn shows a witch stirring the brew and then adding various items such as cats, ghosts, bats, spider webs, pumpkins and goblins. This would be a fairly easy concept to make on your own. I LOVED this book for TWO reasons. . . 1)It is repetitive and by the 2nd page, even my kiddos with limited verbal skills were singing the carrier phrase "stirring and stirring the brew, P. U!" and 2) There were many opportunities to use the CORE word "in". While I read this story to my students, I also had a "cauldron" that I found on sale at Target (I found it near the traditional "pumpkin" buckets). I had pictures of each item from the story and a spoon for each student. I also had large picture symbols of the core word that I was working on with the students "in" and later we added "out".


I also found a pre-made board from Boardmakershare.com that depicts some images to pair with this story. Visit the link HERE .


Another book I used last week to incorporate CORE vocabulary was the story "Big Pumpkin" by Erica Silverman. Fortunately I was able to find MANY activities online to go with this book.
For this story, we focused on the CORE words "ON" and "OFF". I started by practicing ON and OFF using small objects and large blocks. I also made large picture cards to depict the "symbol" to associate with each word.


I love this story because it is repetitive with carrier phrases and adds a new character to each page. My kids especially loved when I would "change" my voice while reading each page. This story also leant itself to many great questions and vocabulary words, and of course, story elements. For my youngest students, I used picture symbols to help them focus on the the concept "ON". Our carrier phrase was "the (witch) pulled, the pumpkin stayed ON". I also found these awesome links with visuals to add to the story activities!
  • Vocabulary cards HERE
  • Literacy activities, coloring sheets, sequence cards, & craft activities HERE
  • Poem, Story Re-tell, and Book report HERE
  • Boardmaker Story board and picture symbols HERE


The last story that I have used this month to work on CORE vocabulary is "The Little Old Lady Who Wasn't Afraid of Anything" by Linda Williams.

I love this story for MANY reasons in addition to the CORE vocabulary that is targeted. The carrier phrase that I focused on with core words was "SHE said, I am not afraid of YOU". The anticipation in this book made it very exciting to read and re-tell many times! I created this visual to teach the core words "YOU", "I", "SHE" and "HE", all of which can be used with this book and it's repetitive text.

I also found many other amazing online activities to pair with this story!
  • Literacy, Art, and Circle Time activities HERE
  • Story board and picture symbols HERE
  • Boardmaker Communication Board HERE
  
This school year, I have added many new students to my caseload and many new students with limited verbal skills and/or poor general intelligibility of speech. My "knee-jerk" response was to GO CORE with more students. If you have not yet gone "CORE", I encourage you to research this topic and you will see some pretty amazing results.

Thank you Gail Van Tatenhove for your amazing work in this area!

~Orlanda

May 4, 2012

Simple Speech--"The Tiny Seed" by Eric Carle

It's time for another SIMPLE SPEECH idea! Incorporating literacy in the speech therapy sessions has become a passion of mine. There are SO many ENDLESS opportunities for speech and language when a storybook is involved!


One of my picks for April was "The Tiny Seed" by Eric Carle. If you are not familiar with this book, it is the story of a tiny seed that travels among other seeds across many lands until it finally lands on the ground. The seed begins to grow once it has water and sunlight and it ultimately becomes a huge flower that is taller than the houses and the trees. At the end of the story, the seed pouch opens up and new seeds blow in the wind in anticipation of growing into more beautiful flowers. I think this story is a fun expansion of the cycle from seed to plant and my students really seemed to enjoy it!

We used this story in speech to target so many goals including: vocabulary expansion, synonyms, descriptive language, compare/contrast, predictions, sequencing, story re-tell, story expansion, and articulation of /t, s, sm, pl/ to name a few! My students in articulation therpay became "speech detectives" and listened and looked for their target sound throughout the entire book, so we made it work for every sound in therapy! After we read the story, we made our own version of the story. The students retold the story while illustrating their own stories. We also practiced summarizing in first grade, and that was a bit of a challenge. This is how they turned out:


I expanded the activity based on the level of the students from PK-1st grade. First graders wrote their own sentences and expanded with more steps and more sentences.

After we completed our Tiny Seed stories, we planted "speech smiles". The students were required to come up with a list of items we would need to plant our own seeds and then describe "how to" plant and grow a seed. We planted several tiny seeds using Rye grass and gave them faces. Here is how they turned out:


Speech Smiles

We had such a great time with this activity and depending on the group, it took 3-4 sessions to complete all of the activities. One of their favorite parts of this activity has been watering and checking their plants daily. My students working on R were VERY excited that they could see ROOTS in their plants. I hope you have as much fun with this activity as we did!

~Orlanda

May 1, 2012

Collaboration in Speech Therapy and Special Education--A Success Story

In honor of Better Speech and Hearing Month, we thought we would kick of May with a success story from our collaboration through speech therapy and special education services.

The story begins with a kindergarten boy . . . This young boy melted our hearts the moment we laid eyes on him, an adorable and huggable little guy. He came to us as a kindergartener after his previous educational team had deemed it necessary for him to have a second round of kindergarten. During his previous year in school, he was evaluated and found to have a speech and language impairment and had begun receiving speech therapy earlier that spring.

It didn't take long for us to realize that this child's challenges far exceeded that which could be provided by traditional speech therapy services alone. In addition to his deficits in articulation and language, he struggled with listening/attending skills, social/behavioral skills, and academic skills. As his SLP and case manager at the time, I had to work closely and diligently with his teacher and the campus staff to collect sufficient data needed in order to provide additional services. Thanks to an amazing campus and administration, we were able to begin providing him with additional inclusion and resource supports through our Social Communication Resources and Services Program while he was being evaluated for an additional disability.

As we began developing a program for this student, Kelley and I worked collaboratively to develop social stories in order to teach him school rules and routines. Kelley also worked diligently with the classroom teacher to develop positive behavior supports and teach behavior expectations through the use of discrete trial techniques. These same techniques were also used during his small group pull-out sessions in speech therapy and in the areas of reading and writing. Kelley and I also included this student in a co-taught Social Thinking group and started directly teaching social thinking skills such as Whole Body Listening and Expected and Unexpected Behaviors. We, along with his teacher and administrators, worked diligently through months of tantrums and tears with this child. As he came to the end of his kindergarten year, we saw significant changes in his behavior and attention.

Also in the midst of chipping away at this students behavioral challenges, we used collaborative efforts and techniques to make changes to his speech, language, and academic skills.  In speech therapy, I focused primarily on his motor speech deficit in a small group with 1-2 other students. It wasn't long before Kelley inquired about how this was being accomplished and she quickly was on board with trying out a new program to work on his reading skills. Together, we used various aspects of the Lindamood Phoneme Sequencing Program for Reading, Spelling, and Speech or LiPS Program.


This program, developed by Lindamood Bell, has a great series of visuals and techniques for developing all skills related to speech, reading and spelling. From a motor-speech aspect, I have used the Mouth Pictures and corresponding Phoneme cues to teach articulation skills. The cues are very descriptive and easy for students of all ages to understand.


Using these cues in speech therapy and then transitioning the same cues into this child's resource classroom really seemed to bridge the gap for him as he learned to identify and name letters and sounds and then sequence these sounds with appropriate coordination for speaking and reading. Using a multi-sensory and collaborative approach for this child significantly contributed to his progress in speech, language, reading, and writing. This type of program is inherently designed to help coordinate the development of all three of these skills. I highly encourage SLPs and teachers to coordinate their efforts and combine their expertise regarding motor-speech and oral language development with developing reading and writing skills.

Thanks to a great TEAM approach, this child is now at the end of his first grade year speaking with much greater intelligibility of speech, reading independently on grade level, and writing on grade level with minimal accommodations and daily supports. He remains in speech therapy to support continued increases in intelligibility of speech, particularly in the area of sequencing complex co-articulation as well as improving expressive syntax to age appropriate levels. But overall, this student's success is clearly the result of a collaborative approach.

~Orlanda

February 25, 2012

Simple Speech ~ "It Looked Like Spilt Milk"

Spring is beginning to "spring" in my school, and what does that mean? A WAVE of new referrals for speech/language testing!  So, as a result, the little time I had for planning therapy sessions has dwindled from minutes to seconds on many days. . .I know, I know, planning is very important in speech therapy, in classrooms, yada, yada, yada. . . but the reality is, when you are a school-based clinician with MANY kids and often multiple schools (or in my case, keeping a growing caseload and supervising two new SLPs who are in their CF year. . .), you do what you can to keep your head above water some days and manage to get the job done.  Fortunately for me, I have been at this a while, so I have many "go to" activities that I can make work for just about any student (particularly the young ones, PK-1st/2nd grade).  So, I thought I'd share my SIMPLE SPEECH activity of this week (meaning it required only a few materials and little to no prep time before the speech session). . .I'll keep adding to the list of "Simple Speech" activities. . .in my spare time. 

For this week, I pulled in an activity that I have done for several years now.  I was introduced to this book and craft (origin uknown) during my days working on a district speech therapy program that focused on intervention for 3-5 year old students specifically with articulation and expressive language impairments. That program has since fallen victim to "budget cuts", but the ideas and activities live on and I try to find ways to add to them or expand them for my slightly older students each year! The book used for this activity is "It Looked Like Spilt Milk" by Charles G. Shaw.  Here it is:

It's a pretty popular book if you haven't already seen it. Check in your school library or with your fellow teachers or SLPs and I'm sure you'll get your hands on it quick!  In this story each page has a white "figure" of various objects such as an ice cream cone, a birthday cake, a rabbit, etc.  Also, it is filled with repetitive text by including the same phrases on each page.  At the end of the story, you learn that each of these figures is actually a "cloud" in the sky.

Some perfect articulation targets for this book are: word-initial L and word-final K because you'll see the phrase "Sometimes It Looked Like. . ." on each page. Some Language targets that I used with this book this week were: temporal phrases ("sometimes"), regular past tense ("looked"), describing (have the students describe details as to "how" they could tell each figure was a particular object).

With almost all of my students I can read the first page or two and they can "read" the rest because it is repetitive, and this offers many opportunities to practice these articulation and language targets.  For kids who might not do that, hearing it first is a great way to bombard the auditory system with these sound targets.

I really like to choose activities and stories that I can continue for at least 2 sessions. So, with this activity, on the first day, we read the story, described each figure and discussed the children's experiences with seeing "pictures" in the clouds. Then we made our own "cloud" paintings.  Here is how a few of them came out, what do you think you see?

The way we did it was, I took a half sheet of blue construction paper (light or dark would work), and I folded it to give it a crease and a "target" for the child. I gave each of them a paintbrush and white paint and gave them instructions (and modeled) on how to paint their picture by "dabbing" paint in any way they wanted near the center of the paper.  <By the way, this helped me add in other language targets regarding "position" and "following directions". I even had my students who need to work on comprehending instructions repeat the instructions back to the entire group>.  Then they were instructed to paint for a few seconds (about 10) until I said to stop. Finally, I had them fold the paper over and "spread" the paint. When they opened it up, it really changed their picture and they were very creative in describing what they saw in their "clouds".  It's a pretty quick project, so each student was able to make three clouds.  That took our entire session and this gave our paintings time to dry until the next session.

In our next session (or maybe even 2 more sessions depending on time allowed), we had more fun with this story and activity. Of course, we started with recall/retell (another language target), and then I took the students outside on a "cloud walk" and we walked around the school observing and describing clouds.  It was a GREAT way to work on generalizing these targets in conversation and outside of the therapy room, and it was nice to get some fresh air! After that (either the same day or the next), we came back to our cloud paintings and assembled our own "book".  I gave each student a "cover" using a blank piece of the same colored construction paper.  For the younger students, we came up with a title together and I typed it and printed it out so they could glue it to their cover. They were also given the opportunity to illustrate their cover with crayons.  Then we added our own words to the book.  For my younger students, I wrote the words in their books or typed it up so they could glue it in.  For my older students, they wrote their own or dictated to me so they could copy their sentences from my board.  They all had a great time during this activity and they each have their own "published book" that they can take home and read to their parents.

This week I took pictures of their books.  Here they are!


I also assigned them homework to take their families on a "Cloud Walk."

I hope you enjoy this SIMPLE SPEECH activity with your students!

     ~Orlanda