March 27, 2012

"Where is it?"--An Activity for Articulation and Language Therapy


Do you ever get a case of "the Mondays"?  Recently, I had a case of "the Mondays" and it was an especially chronic case because it was the Monday AFTER Spring Break...and my coffee couldn't kick in quick enough!  So, to overcome it, we had LOTS of MOVEMENT in speech therapy that day.

It started with an "off the cuff" new game with one of my four year old students that we called, "Where is it?"  This is probably a game I have played for years, but has been at the bottom of my speech therapy tool box until that Monday!  All we used were a set of photo articulation cards (you will see /s/ blends pictured here) and the Speech Room.  My student has been working on this target for only a few weeks now and has quickly established this target in single words and simple sentences.  It was time to transition him to generalized skills in connected speech, so we played this GREAT game.  The student and I each had the same picture card and we placed them in various places around the room.  It didn't take long for him to catch on the game required each of us to ask each other "Where is your ___" and then reveal where we had placed our picture by describing it in a sentence.

Here were some of our favorite "spots":

I asked:  "Where is your sweater?" and he responded, "The sweater is on the clock."


I asked, "where is your spider?" and he responded, "My spider is in the markers."


I prompted him to ask me, "Where is your spider, Mrs. D?" and I modeled, "My spider is on the book shelf."


It's pretty easy to see that this game can also be used to target many receptive language goals by having students place pictures or objects in various places around the room  and practice following directions, and  understanding positional concepts; expressive language goals such as answer "where" questions, use expanded utterance length, use pronouns correctly, question formulation, etc; AND (of course) pragmatic language goals such as turn taking, engaging in reciprocal interaction, and maintaining eye gaze.

I hope you have as much fun playing this game as we did. . .maybe it will cure your case of "The Mondays!"

     ~Orlanda

March 22, 2012

The Sensory Break Center

I'm fortunate to have a nice big classroom with space for a Sensory Break Center in my current school. Previously, I was crammed in a tiny portable with several other teachers and had to make do with an overloaded shelf in a closet. This is what I looked like on most days!
In this classroom, I have set up an area with the Learning Zone and Zones of Regulation tools. If you'd like to download the Learning Zone poster, please click here.


We have tools for various sensory needs (visual, auditory, gross motor, fine motor, proprioceptive, vestibular). I have gathered tools from yard sales, raiding my kids' closets as they outgrow items, and purchasing some items with the small allowance we are given each year to spend on materials in our district. Over the years I've been able to accumulate the items that get the most use and weed out unnecessary items.

Here's an overview of how the area is set up. I placed bookshelves on either side with the smaller fine motor items. The gross motor items are in the center. The Learning Zone and Zones of Regulation tools are on the bulletin board. The therapy balls and Hippity Hops are stored on the ball rack.


Here are some close-ups of the fine motor items...


The kids LOVE the Yoga Pretzels visual cards and the Finders Keepers toy...


the green toy (I can't remember the name of it!) is a fave...


The Theraputty, Rubik's Cube, and homemade magnet jar help calm many of my students who need to "shut out the world" for a little while. The magnet jar is just an old mayo jar with cut up pipe cleaners. I found the magnet wand at WalMart.


The Play-Doh and stress balls are also handy to grab for a quick break.


The Brain Noodles are super popular with several students. When they sit down with these for a quick sensory break they truly block out the world! It helps them re-charge. I think I found these on clearance for next-to-nothing at WalMart.


I also made a few cheap-o rainsticks with different sounds out of cardboard tubes, rice, and beans.

Some of the tried-and-true items that seem to work the best for the kids and were worth the purchase price are the Pea Pod (we call it the canoe),


the Exerbug,

the mini-trampoline,

the Body Sock,

the Lite Brite,

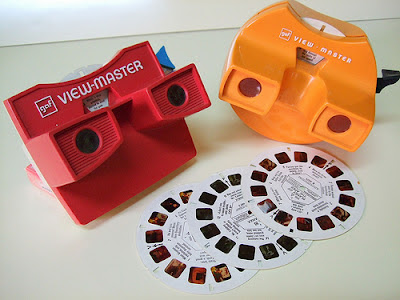
the ViewMasters,


the Brain Noodles

and the exercise bands.


This year I made a ball rack to keep the therapy balls and Hippity-Hops from rolling all over the place. It was a cheap, easy way to keep the area a bit neater. This week, I promise to take close up pictures of it and post how to make a cheap-o ball rack.


March 18, 2012

Articulation Therapy Tools

Time for me to share some of my favorite self-created articulation therapy tools!  I have many tools that I have created over the years and will be sharing more soon, but here are some starters.  These two visuals are permanent fixtures in the speech therapy room!

First, I want to share the Speech Target.  Here it is.


In my recent Pinterest and Blog browsing, I have seen similar "rubric" styles for articulation therapy, and I think it's a great idea.  The idea of using a rubric in articulation therapy came to me a couple of years ago after attending a training that focused on language therapy.  I found that I needed a way to give some positive feedback to my students in articulation therapy that were really "stuck" at becoming stimulable for their target sounds.  (The most trouble, as always, has been that R sound!)  I knew that my students were working their tails off with their oral motor exercises, traditional drill practice in therapy, and consistenly completing homework activities.  I could "hear" changes in their speech even if their targets were not completely accurate, so, the Speech Target was born.  Of course, the first one was scribbled on a piece of paper (as many great ideas begin).  But it didn't take long for my students to understand the purpose of the target and to feel their improvements.  Eventually, they were able to accurately discriminate their own speech on the target with little guidance from me.  Sound production was no longer "right" or "wrong" in speech, instead they were getting "closer to the bull's eye"! Now, the Speech Target permanently hangs on my white board and I refer to it frequently in therapy.  Occasionally, I even have the students rate each other on the target to maintain attention of all group members and give them some friendly feedback from their peers. 

Here is the other Articulation Rating Scale I found on Pinterest thanks to the folks at Peadia Staff.  This one was created by speech/language pathologist, Dala, and can be seen on her blog here: Testy Yet Trying.


The other tool that I refer to often in my speech room is the "Good Speech Posture" poster:

Most of my students in articulation therapy focus on some level of oral motor exercises at the beginning and throughout each speech session.  As many SLPs know, lots of our kids with articulation disorders have trouble with isolating their "speech helpers" from each other.  For example, many kids working on tongue tip elevation may be able to achieve this only when they raise or tilt their entire head.  Many times the entire head or body will move in the direciton of the tongue and the same goes for the jaw.  So, I have worked really hard to teach my kids the importance of good posture and moving their speech helpers independently from the rest of their body.  While this is the target for many of my students, there are some students who need the added body movements in order to achieve their phoneme production, but this is a nice tool to have around, especially for my wiggly speech students! 

I hope you can find these tools useful in your speech room!

     ~Orlanda 


March 5, 2012

The Learning Zone

I used to regularly have my students identify their feelings at the beginning of social groups. What I found was that many of my kids on the Autism Spectrum had immense difficulty identifying anything other than feeling happy...
or mad...


When I delved deeper I realized the problem was that they didn't know what feelings felt like in their bodies. It became more important to me that they identify how their bodies felt and how that related to being ready to learn. After developing the skill of analyzing their own bodies, we could move into explicit instruction in labeling the feelings that are frequently attached to those physical feelings.


I came up with a tool that we use daily called the Learning Zone. I ask the students to check how their bodies feel on a spectrum that ranges from low energy states to high energy states. The visual tool helps teach the students that there is a range of states that can still encompass being in the "Learning Zone". Too many times I had students who felt like they couldn't pay attention in a group because they weren't "happy". This tool shows that you don't have to be in a perfect place in order to attend to the group. If your physical state is outside the Learning Zone, then you must take steps to bring yourself back into the Learning Zone. This encourages the students to actively use strategies to help regulate their bodies.
I had the poster professionally printed pretty inexpensively through our school district's media center. I added a strip of velcro down the side of the spectrum, printed out small laminated cardstock name tags and put adhesive velcro on those. The kids know that when the come into the classroom they are to "check in" at the Learning Zone visual, choose an appropriate activity that will help them either stay in the Learning Zone or choose an activity that will help them get into the Learning Zone (gross motor to increase energy or something calming if they are overly excited). After their Sensory Break, they re-check in at the poster to see if they regulated their bodies.


When I introduce the concept of the Learning Zone, we spend a session or two exploring the different tools available in the Sensory Break Center (pics to come soon!). The kids are given a survey sheet where they try various tools and mark whether it helps them have more energy, less energy, or no change. These become their sensory "menus" when they need to choose a tool. I will post pictures soon of the Sensory Break Center and will hunt down a copy of that survey!


I have a list a mile long of all the books I intend to write and the Learning Zone is on that list, but school and children and cats and dogs and church and Boy Scouts and writing the great American novel and Mr. Hively came first! In the meantime, a great book has come out called The Zones of Regulation by Leah Kuypers. We have since combined the use of my Learning Zone tool to be used in conjunction with the Zones of Regulation. It is a perfect fit! One of these days I'll get my book put together, but until then I encourage you to think about ways you can use this tool in your practice and to check out The Zones of Regulation.


Cheers! ~ Kelley

March 3, 2012

Super Duper© Data Tracker App = LIFE SAVER!

Data drives EVERYTHING!!! Am I right?  And it should, no doubt about that. . .but keeping up with it is a craft that many SLPs and Teachers work hard to perfect every day!

Well, the awesome folks at Super Duper© Inc. are at it again with the addition of many apps for iPhone, iPad, iPod and now Android.  I recently purchased the Super Duper© Data Tracker App and have not regretted my $5.99 purchase!  I am a bit frugal, so I "phoned a friend" before making the purchase and she said that while she didn't frequently use it, she thought it might be worth it.  So, I took the plunge and haven't looked back!  I will say, this is not the ONLY source of data collection for me because of how it is set up. So, let me tell you about it and then I'll fill you in on how I use it to make my life easier!


When you buy the app, you first have to set up your student profile by adding "players" and assigning goals to each player.  You will also assign your measurement method by choosing from correct/incorrect or adding "approximation" or "cued".  I love that it has so many options!  I have recently started using this tool more frequently for language targets by choosing the "four" options:  correct, incorrect, approximated (or what I use as a cued incorrect response) and cued (or what I sometimes use as a cued correct response).  My co-teacher, Kelley has started using the "approximation" to count the cues per session.  The beauty of it is that you can make it work for you! 

Also from this screen, you can add a player to a "group".  This allows you to put your "data sheets" together by group.  There is also the flexibility to track data for one student at a time whether they are in a group or not, and there is also an option to remove a player from a session if they are absent.


The other cool thing is that all of your data is CALUCULATED FOR YOU!  Yes, you heard me right, you DON'T have to calculate your own data!  I think this is what takes me the longest and this is the best part about it.  And I know that all the speechies out there can identify with couting tally marks!  This is what it looks like.  You can even choose to email the data if you need to, which would be great for sharing with parents or printing for your data books!

In a recent update, they also added a "graphing" option, which is another great visual for showing progress to parents or teachers.  You can choose the date range or range of sessions to show for each student. Check it out!


I know, it's pretty amazing, isn't it!  Click this link for a video tutorial from Super Duper©.
.

Super Duper Data Tracker App Video

Now, here is the trick to using this tool. . .and the one that is "make or break" if I use it in a therapy session:  it is easiest to use this tool in an individual session OR in a small group session (2-3 students) or in a session where turns are clearly defined and used.  I can use this tool in structured groups of up to 4-5 students, but if they are not great at taking turns, it's easy to mis-mark data.  The reason for this is that you cannot see multiple player goals on one screen.  When using this tool in a group, you have to swipe the top of the screen to switch players.  In my opinion, this tool is MOST useful in my articulation therapy sessions where I am working to attain over 50 trials per student and sometimes with multiple targets. I have also learned that many sessions can be stored until I get that "free moment" where I can put the data in my service log for each student, but now that takes only a few minutes per child!

As you can tell, I love this new tool from Super Duper© and maybe you will find it a useful time saver, too!

    ~Orlanda