Showing posts with label Collaborative Teaching. Show all posts

March 2, 2013

Feelings and Emotions ~ Literacy, Language and Social Communication Activities ~by Orlanda

Whew! It's been a while since I have posted, but Kelley and I have been working HARD in our speech and special education classrooms and trying to balance work life and home life! We have spent the last few weeks with a focus on FEELINGS and EMOTIONS with many of our students. We have been using the Emotions Cue Card created by Kelley in all of our sessions to help our students identify their own emotions at the beginning of each social group session. We have found that some of our students have difficulty describing their own emotional state, so we talk about it every week!

Kelley and I work together with a wide variety of students with language, social communication and social behavioral needs and this topic is ongoing for all of these students. In addition, I work with many students with language impairments that have difficulty describing feelings as it relates to others or characters in stories that are read and heard as well as in their own oral and written expression. So, in addition to the groups that we teach together, I have been working on this skill with ALL of my groups. I even managed to incorporate many articulation goals with this lesson, here's how I did it....

We started in our social groups and speech/language groups reading these stories:


The Way I Feel was great with ALL of our young age groups (3 year olds-2nd grade students). It was easy to modify the language throughout the story and match emotions pictures. Today I Feel Silly & Other Moods That Make My Day was was great for students Kindergarten through 2nd grade because it had more words and more details in the pictures throughout the story. How Are You Peeling? Foods with Moods was a little too "abstract" for my younger students to recognize the feelings or emotions depicted in the photos, but it was great for my 1st and 2nd grade students. While we read each of these books, we had the Emotions Cue Card handy to match feelings from the book to the photos on the cue card. Additionally, I collected many other Emotions Photos to match feelings and emotions throughout these stories. Several of our students have difficulty understanding and seeing that people depict similar emotions in slightly different ways, so we wanted to offer a variety "faces" for our students to help them see and understand the similarities/differences between faces and feelings. Here is one page of the Emotions Photos that I used for my students to match and describe emotions.


This Emotions Photos document is 4 pages of photos depicting Happy, Sad, Mad/Frustrated, Calm, Scared and Tired. You can grab it here. I turned these photos into cards by cutting the pictures out and laminating them onto large index cards.
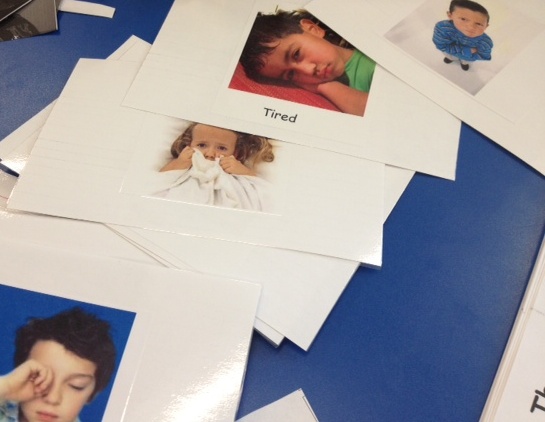

While reading all of the Feelings books, we targeted goals such as Answering Basic Questions, Describing details in pictures and using Inference to determine the character's feelings. Each time we read the books, we used the Emotions Photos to match the feelings of the characters. For students in articulation therapy, we continued to use these books and activities and were able to focus on phonemes such as /f, s, sm, sk, l/ to name a few.

After reading each of the stories (over 2-3 sessions), we started making our own book of feelings. With our young kindergarten group, we have several students with low receptive/expressive language skills and poor social communication skills. In this group, we have targeted each emotion in our own book in 1-2 sessions. We started each "emotion exploration" using a computer software program called Faceland.


We LOVE this program because it teaches the students what "clues" to look for on faces to determine the emotion. Each new emotion that is taught is broken into 2-3 facial cues from the eyebrows/forehead, eyes, and mouth. This program also allows the students to see the same emotion depicted in slightly different ways between different people. There are also questions that it asks, and the students have to match the situation to the emotion. For our young students, we often have to act/draw out these questions to help them understand; however, it really helps them learn the feelings. There are even follow up games that go along with each emotion, so it is very engaging!

After going through Faceland, we started making our own book called "My Book of Feelings". Here are some sample pages from this book:


We took pictures of our students depicting the emotion that was stated on each page. This was easiest to do during our Faceland activities for some of our students. Others just needed the Emotions Cue Card or Emotion Photos and a mirror to match their own faces to the feelings. Some students enjoyed taking their picture using the iPad with the camera in "reverse" mode so that they could see themselves making the faces. Still, some of our youngest students (3 year olds) had a hard time making the faces that they were not feeling in the moment, so we improvised by using other pictures or catching them in the act! Needless to say, this was one of the most fun parts of the activity, and all of our students LOVE seeing pictures of themselves in their own books! Here is how one turned out!


Our students with expressive language impairments had some difficulty independently coming up with "things that make me feel ___" so I created a document with pictures for the kids to choose from. A sample of this document is pictured, but you can grab the entire document HERE.


We also found that different students had different feelings about the pictures offered. For example, one of our students feels HAPPY when tying her shoes but another said that this made him feel FRUSTRATED because it was hard for him.

For our youngegst students, we also used the Emotions Photos cards to discuss Similarities and Differences and the "I Feel __ When" cards to Categorize emotions. For our older students in speech/language therapy, we continued expanding this lesson by coming up with synonyms for the feeling words and using them to re-tell or create stories of our own. In their Book of Feelings, we made it harder by having them expand their own stories with their personal experiences.

This has been a great activity for ALL of our students. We have had the opportunity to learn so much about them and they have really improved their ability to describe their feelings and the feelings of others. AND, they will be able to share their books with their families for ongoing conversations at home!

We hope you find these activities useful with the speech, language, and social communication needs of your students! We'd love to know How You Feel about these activities and how we can make them even better!

   ~~Orlanda

November 4, 2012

Easy Lessons to Target Play Skills & Sharing

Orlanda and I have spent a considerable amount of time over the past 6 weeks in our collaborative speech/social thinking groups working with our "littles" on basic play skills and sharing. We have two small groups (4 kids each) that we needed to target these skills. One group is made up solely of Kinder students who have significant speech and language delays (both articulation and pragmatic language) and ADHD. The second group is made up of Kinder and 1st grade students who all have pragmatic language deficits, but are "higher" than the first group. The students in this group have Autism Spectrum Disorder and Speech Impairment.

We grouped the lessons in this unit into indoor play skills and outdoor play skills.
During the outdoor play lessons we listed different activities that the kids like to play outside and which were solitary activities vs activities they do with others. After choosing a few of the most common activities on the lists, we taught the explicit rules and defined the "hidden rules" for those activities. We read portions of The Social Skills Picture Book by Jed Baker, PhD that related to outdoor play.
We then took the kids outside to the Kinder playground when no other students were outside to practice taking turns with the balls and playing a simple game that required joint attention. The kids did a great job.

Next, we began to target indoor play skills. We specifically wanted to make sure to address the kinds of activities the kids engage in Kindergarten and 1st grade "centers". We again made lists of activities they did indoors and divided them into solitary vs activities done with others. We read applicable parts from The Social Skills Picture Book again and discussed "hidden rules" for playing with others during centers. We spent several sessions watching and discussing the lessons on sharing and taking turns from Playtime with Zeebu. The kids loved Zeebu and it provides a great anchor to remind students to share in the inclusion setting.
We spent a session reading a picture book on sharing. For the Kinder students with less language sophistication, we read Will Sheila Share? by Elivia Savadier. For the combo Kinder/1st grade group, we read I Am Extremely Absolutely Boiling by Lauren Child.

Finally, we spent several sessions practicing sharing and indoor play. During the first session, we used wooden trains and train tracks (which worked really well since there is an example of sharing/not sharing with trains in the Zeebu video). During the second session we used Legos. Before the first session we spent time teaching various phrases that could be used to initiate play and to help facilitate sharing using this visual.

When we played with train tracks I initially "controlled" access to the tracks handing out one or two to each child and then prompting them to use the scripts to ask for more from me or from a peer. When we did the Lego activity, Orlanda gave each child a small pile of Legos that they eagerly started building with individually. Sure enough, they soon wanted more. They were prompted to ask a friend for a piece. Ya gotta love a little sabotage! :) We do have a few students who we wanted to target accepting "no thanks" from their peer for an answer while we also had one particular student who tends to get run over by his peers and we wanted to help him know it was ok to say "no thanks" at times. This led to some interesting interactions!

I have worked on generalizing the skills from small group to the inclusion classroom by using this powerpoint social story. I just load it on one of the classroom computers in the specific classrooms and prompt the kids to read it (either independently or with me) before center time. Feel free to download it for your use!


I hope that you will find the lesson ideas and tools to be useful with your students.  ~ Kelley

September 18, 2012

My Favorite Lesson Planner

I've never been able to use a lesson plan book because there are not enough compartments in the day. I teach anywhere from 6-10 lessons a day depending on the schedule. I've tried various ways of lesson planning in the past, but I finally found a system last year that worked well for me. I created a template from a simple Word document so I can add or delete columns each semester as needed.

This year I had to add a second page. I now have one page with academic lessons...
and one for Social Thinking Groups...
I hole punch the pages each week and hang them with notebook rings on the front of an open file box.

The box contains info that I need at my fingertips. I like this system because it keeps the lesson plans within sight. Since Orlanda and I co-teach social groups, she can also view the lesson plans if I am held up with a student issue.

If you'd like to use this template, feel free to download it here.
I'd love to hear about how you write your lesson plans. Please share your ideas in the comments!

Please join as a follower if you haven't already! 
~Kelley

September 8, 2012

Tips for Organizing Small Classroom Spaces & Therapy Rooms

Do you need help for going from this:


to this?


Maybe we can help!

If you are a special education teacher or a speech language pathologist working in a school setting, then you are probably no stranger to working in small or tight quarters. In many cases, specialized teachers or therapists have to share or borrow spaces to serve students. Our experiences over the years have really shaped how we set up our space in ways that we feel are vital to the success of our students, whether we are working in a "broom closet" or have an entire classroom to ourselves! We've put together this list of "tips" to consider when preparing your small work space, we hope you find it helpful!

#1~Everything in your space should be PURPOSEFUL and USEFUL to you and your students. We are guilty of falling into the trap of purchasing something for our workspace because of how "cute" it is or how it looks to represent our "style" (or sometimes because it is a great "deal"). However, as the needs of our students are often changing, we have learned to "Let Go" of some of those miscellaneous items in our rooms. Now, don't get us wrong, we have certain items that are personal (like family photos) or items that contribute to our sanity (such as that picture of our toes in the sand from the summer to remind us of the peace we felt in paradise). BUT, these personal items are minimal and reserved for the "student free zone" in our space. Here is a photo of the "student free zone" in the speech room.


The biggest challenge of this task was actually determining "where" in the room this space would go. We have both had challenges in our spaces of where to place ourselves so that we make our space feel bigger and so that we can see the door and no one can creep up on us! It was also important to make it seem "un-interesting" so that students wouldn't be distracted and want to spend time in that space. Of course, the occasional wanderer travels into this zone and is promptly redirected to a "student friendly" spot.

#2~Consider reducing the amount of "Visual Noise" that is present in the space.
We all have those VISUAL TOOLS that we NEED on the wall, bulletin board, or within arms reach. The REAL question is, do they ALL need to be hanging in our rooms at the same time? Is there a better, more efficient, and less visually distracting way to access these tools? How can we prioritize the tools that are necessary for the majority of our students? These are just a few of the questions we ask ourselves when we make a choice to hang something on the wall, whether temporarily or permanently. After all, the majority of our students learn best when verbal information can be paired with VISUAL information.

We encourage you to think about ways to promote student focus and attention toward your target concept, especially when your specialized instruction "time" is limited. We highly encourage the use of visuals to assist when teaching, but we have also learned that many of the students that we work with have a hard time focusing their attention and/or have difficulty learning in an environment with too much visual stimulation. 

In the speech room, the "permanent" visuals are now limited to The Whole Body Listening Visual, The Speech Target, the Good Speech Posture Poster the Speech Lab visual schedule. I also made a small poster that says "Everything we Say and Do in the Speech Room must be Rated E or G" (some of my students were getting a little out of hand!). Find it Here.

Here are some photos of the visuals hanging in our rooms:


This incentive system is located on the wall BEHIND where the students sit.
So, they sit with their backs to this board, and that REALLY helps!


Another good idea for decreasing visual noise is to cover open book shelves. As I visited many classroom websites, this has been a fairly common theme. In the speech room, this was accomplished with curtains and tension rods. We also focused on choosing fabric that wasn't too visually stimulating. With this simple idea, the "game" shelf (that every student loves to browse in) went from this:


to this,


This was the "old" curtain. . .


to this!


Now, this shelf is MUCH LESS visually distracting, and the
students are less likely to inquire about the contents of the shelf.

Decreasing the "visual noise" in this space has probably been the most NOTICEABLE change. This year, everyone (students included) who walks into the speech room has either said that the room feels "bigger", "calmer", or "welcoming". Many have also asked if I took anything out of the room. All that changed was removing unnecessary visuals from the wall and moving them to a place where I can pull them when needed, and changing the "coverings". What a difference it has made!

#3-Consider creating "Zones" for different types of activities.
We already mentioned the "student free" zone; every teacher and therapist needs one! But, we also have zones in the speech therapy room for different types of learning and different types of learners.

The speech therapy room is divided into three main "zones": The Flower Table, The Carpet, and The Computer.

The Flower Table is where most of the speech therapy takes place for the school-aged population. This is where ALL kinds of therapy happens from articulation games, to story telling/retelling, to Play Dough play. This table is AWESOME! It has space for 6 people and offers lots of space for all kinds of activities.


The Carpet is where the majority of speech therapy takes place for the 3-5 year old population including story-based therapy, play-based therapy, and movement activities. The carpet is small, about 16 X 20, so as not to overtake the small therapy space. It's just enough room for 2-4 small children. The rolling easel pictured also has a felt board on the other side. The Rolling stool is great because you can move around quickly and are close the the floor, and it even has a little tray underneath for storing materials.


We recognize that many small spaces don't often have enough room for a teacher zone, a table, AND a carpet area; however, we highly encourage you to consider your population and the amount of "free movement" space that they might need. In such cases, maybe we can combine an area such as the teacher space and table space.

Although it's not pictured here, The Computer is very useful for lots of therapy activities such as watching video models, engaging in educational & motivational computer programs, and using PowerPoint presentations for articulation practice or auditory bombardment.


 ********************************************************************************

We hope you find these simple tips helpful when setting up, organizing or re-organizing your small space! We hope to have pictures up soon of Kelley's special education room where we collaboratively teach many of our students. We'd also love to hear from you! What have you used in your small space to maintain an inviting and functional learning environment?

~Orlanda  


May 1, 2012

Collaboration in Speech Therapy and Special Education--A Success Story

In honor of Better Speech and Hearing Month, we thought we would kick of May with a success story from our collaboration through speech therapy and special education services.

The story begins with a kindergarten boy . . . This young boy melted our hearts the moment we laid eyes on him, an adorable and huggable little guy. He came to us as a kindergartener after his previous educational team had deemed it necessary for him to have a second round of kindergarten. During his previous year in school, he was evaluated and found to have a speech and language impairment and had begun receiving speech therapy earlier that spring.

It didn't take long for us to realize that this child's challenges far exceeded that which could be provided by traditional speech therapy services alone. In addition to his deficits in articulation and language, he struggled with listening/attending skills, social/behavioral skills, and academic skills. As his SLP and case manager at the time, I had to work closely and diligently with his teacher and the campus staff to collect sufficient data needed in order to provide additional services. Thanks to an amazing campus and administration, we were able to begin providing him with additional inclusion and resource supports through our Social Communication Resources and Services Program while he was being evaluated for an additional disability.

As we began developing a program for this student, Kelley and I worked collaboratively to develop social stories in order to teach him school rules and routines. Kelley also worked diligently with the classroom teacher to develop positive behavior supports and teach behavior expectations through the use of discrete trial techniques. These same techniques were also used during his small group pull-out sessions in speech therapy and in the areas of reading and writing. Kelley and I also included this student in a co-taught Social Thinking group and started directly teaching social thinking skills such as Whole Body Listening and Expected and Unexpected Behaviors. We, along with his teacher and administrators, worked diligently through months of tantrums and tears with this child. As he came to the end of his kindergarten year, we saw significant changes in his behavior and attention.

Also in the midst of chipping away at this students behavioral challenges, we used collaborative efforts and techniques to make changes to his speech, language, and academic skills.  In speech therapy, I focused primarily on his motor speech deficit in a small group with 1-2 other students. It wasn't long before Kelley inquired about how this was being accomplished and she quickly was on board with trying out a new program to work on his reading skills. Together, we used various aspects of the Lindamood Phoneme Sequencing Program for Reading, Spelling, and Speech or LiPS Program.


This program, developed by Lindamood Bell, has a great series of visuals and techniques for developing all skills related to speech, reading and spelling. From a motor-speech aspect, I have used the Mouth Pictures and corresponding Phoneme cues to teach articulation skills. The cues are very descriptive and easy for students of all ages to understand.


Using these cues in speech therapy and then transitioning the same cues into this child's resource classroom really seemed to bridge the gap for him as he learned to identify and name letters and sounds and then sequence these sounds with appropriate coordination for speaking and reading. Using a multi-sensory and collaborative approach for this child significantly contributed to his progress in speech, language, reading, and writing. This type of program is inherently designed to help coordinate the development of all three of these skills. I highly encourage SLPs and teachers to coordinate their efforts and combine their expertise regarding motor-speech and oral language development with developing reading and writing skills.

Thanks to a great TEAM approach, this child is now at the end of his first grade year speaking with much greater intelligibility of speech, reading independently on grade level, and writing on grade level with minimal accommodations and daily supports. He remains in speech therapy to support continued increases in intelligibility of speech, particularly in the area of sequencing complex co-articulation as well as improving expressive syntax to age appropriate levels. But overall, this student's success is clearly the result of a collaborative approach.

~Orlanda

January 16, 2012

Top Ten Reasons for the SLP to consider "Co-Teaching"

As a school-based SLP, the idea of "co-teaching" can take on many faces.  With this "top ten" list, I want to focus on the collaborative teaching method that I have embraced with several special education teachers in the last several years.  I am currently in my 10th year as a school-based SLP, and I have incorporated some form of collaborative teaching into my weekly therapy schedule the entire time.  In the beginning, I focused on going "in" to the early childhood intervention classrooms.  This seemed like the perfect place to start since almost every student in that class had some form of communication disorder that required speech therapy.  About 3 or 4 years later, a service was developed in our district that focused on providing specific, research/evidenced based interventions for students with Autism Spectrum Disorders.  It was at this point that I was able to take my co-teaching into another realm.  Since then, I have also become more equipped to provide speech therapy through an inclusion model in the general education classroom (but I'll save that list for another day.)
   
So, I suspect that many school-based SLPs must be shaking your heads at me right now, and wondering "how on earth could I fit in ONE more thing?!"  I also know that school-based SLPs constantly struggle to maintain high caseloads and multiple campuses (not to mention a large scope of practice.)  All I ask is that you take a minute to CONSIDER this list, you just might thank me for it later! 

10.  Sharing Materials--Let's keep it real here, I work in public education, budgets are tight, need I say more?

9. Sharing & Expanding Ideas--I can't say enough about how AMAZING it is to sit in a planning session with my co-teacher (Kelley) while we bounce lesson ideas off of each other.  Because we come from two very different perspectives on the students (mine: communication-based, hers: behavioral-based), the end result is usually something that neither one of us knew we had in us.  Also, I have to admit, after planning therapy for the other 90% of my caseload, my brain is often low on fuel!  I look forward to my planning sessions to get me on track and keep the creativity flowing.

8. Technology Access--Going back to the "budget" issue, I have almost always found that my teachers have access to many more technology tools than myself.  I think I do a pretty good job of making good use of what is available to me. . .but, WOW, what a whole different world it is when you can gain (and maintain) the attention of the entire "social thinking group" just by projecting our visual tools on a Big Screen.  School-based SLPs often joke about working in a "broom closet", and if this is true for you, consider a co-teach model for therapy with a partner on your campus, you just might see the light of day on occasion!


7. Two Brains each with Different "Smarts"--Ever hear the phrase "two heads are better than one"?  Well, if that doesn't say it all, consider this:  I am a speech/language pathologist and my focus is on communication (from every angle).  My co-teach partner is a special education teacher who specializes in working with students with Autism Spectrum Disorders (among other things).  Each of us have been through very different types of specialized training and each with a slightly different focus.  The students that we work with often have a culmination of needs that are intertwined and that can rarely be pinpointed in isolation.  By inter-weaving our areas of specialty in the way we set up and carry out our lessons, it allows us to focus on the "whole" child, and this often eases our ability to generalize their skills into the classroom setting and beyond.

6. Collaborative Goal Setting--We have found this to be crucial in our co-teaching.  By collaborating on our goals, we are able to make sure we address every aspect of the child's needs.  Also, with the students we share, I rarely have the need to develop "separate" speech therapy goals because our focus is on social/behavior skills, part of which involves communication.  And that leads us to reason number 5. . .


This feels so TRUE some days!

5. The "division of labor"-- The "labor" in any group therapy session is multifaceted: it involves carrying out the lesson or activity using a specific intervention strategy, scaffolding appropriately for each individual child's needs, completing ongoing assessments of their skill level (a.k.a. data collection), and planning the next session according to their responses.  Using co-teach, my partner and I are able to divide these responsibilities by taking turns with each aspect weekly.  Since we have set aside a weekly planning session (we do this during a 30 minute lunch once per week), we make sure that we are on the same page with the goals and activities for each session and each student.  During the group, while one of us is teaching, the other one is taking data.  In many cases, although the "lead" takes on the responsibility of scaffolding, the other one is quickly on hand with an added visual tool, nonverbal cue, or verbal cue if the session is taking a "turn in the wrong direction". With this set up, we both feel that we are able to take data more effectively and plan more effectively for our desired outcomes.  Oh, and let's not leave out those "rough days" when I'm running low on fuel and can't seem to muster the energy for leading another group session. . .but you'll have to keep reading for more on this. . .   


4. A Cure for Scheduling Woes--I know, the word "scheduling" is that word that makes almost every school-based SLP and special education teacher cringe.  I am no stranger to that feeling (even 10 years later!) This can be particularly challenging when we have students who have A LOT of IEP time spent outside of their classrooms.  I have found that "making" and "sticking" to a shared schedule for these students eases the stress of the special education teacher, the classroom teacher (who really wants to see their student as much as possible), and myself; and ultimately it helps us maintain the Least Restrictive Environment. Scheduling, in general, is a constant challenge and it requires many "heads" to make it work like a well-oiled machine, but that is a topic for a different day. . .

3. Frequent feedback sessions--Aside from our scheduled planning sessions, just being in the same room together on a frequent and consistent basis allows us to be in constant collaboration with each other.  Since my responsibilities as an SLP require me to be all around the school and on a schedule to see students in 15-45 mintue increments back-to-back on a daily basis, with no built in restroom breaks, and only a 15-20 minute "working" lunch break (occasionally), and days when I need to travel to another school; having our co-teach sessions scheduled weekly allows me to "catch up" and stay "in the know" on each student.  Also, the special education teacher often sees these students on a daily basis in some shape or form, and is the case manager for the student, so this allows me to have a consistent picture of the "whole child" (which we all know ultimately impacts how they are progressing in the therapy environment).

2. Access to "The Generator"--Okay, so in reason number 5, I mentioned those "rough days". . .I'm pretty sure I am not the ONLY one who has them. . .Anyway, sometimes there are days when I walk into the room knowing that its my day to lead the session, but somewhere along the way my motor has stalled out or I have lost power in my brain, I am able to give her a look and she knows to take over.  AND, since we planned the session together, she is ready to go! Oh, and let's not forget those days when I walk in to our group session ready for Kelley to lead the group, and I quickly learn that either A. she is out of the room dealing with an "incident" with another student or B. she has just dealt with a particularly trying incident with another student.  In either case, all she has to do is give me the same "look" and, voila! . . .the machine keeps running, thanks to the "generator".

And last, but not at all least. . .

1. Perspective. . .Pass it On--Aren't most challenges in life really just a matter of "perspective"? Being a part of this "dynamic duo" helps us keep each other "in check" on the reality of any given situation.  Whether it's a particular challenge with a student who is struggling to meet their goals or a parent that needs our extra attention, sometimes just having a partner with different eyes on the same situation offers a different outlook on the situation. And this kind of perspective is even more important to help us see the LIGHT in some situations!  For some reason, human nature holds our attention on the "challenge" or "what needs fixing", but having a co-teacher to communicate with helps keep everything in perspective.


Well, I hope that you find this list helpful when considering the idea of adopting a "collaborative teaching" model for your speech therapy sessions.  I know that there are many other aspects to finding a co-teaching partner to work with (yet another list for another day), but I hope that I have been able to take away some of the "fear" that might be keeping you from traveling down this path!

          ~Orlanda