August 28, 2013

Wow Us Wednesday ~ Classroom Organization Link Party!


It's that time of year! We're recharged from summer break and ready to get our classrooms and therapy rooms set up and organized for the new year. I'm always tweaking my organizational and storage systems to try to make the best use I can of my small space and it is so much easier to do when unpacking after summer break.

I love cruising Pinterest and blog hopping to check out classroom organizational ideas. Here are a few of my recent faves.


I took a couple of weekends last spring and converted all my files to binders. Totally worth the time!


Space Saving Game Storage


Using photos to cue clean-up.
This blog has tons of great ideas!


Orlanda and I want to see YOUR space! We thought it would be great to start a Classroom Tour Linky Party right here at the Dynamic Duo so that we can have a one-stop bounty of classroom tour goodness.

So, snap some pics of your classroom or therapy room and post them here. The link party will be open from now until Wednesday, September 4. If you don't have a blog to link to and still want to share your photos, follow the directions here. And make sure to "like" your faves. We will feature the top 3 "liked" entries in a follow-up post.

We will start the party off with a quick tour of our rooms.

Here's Kelley's SCORES (Social Communication & Resource Program) room. My room was designed to be a physical therapy/occupational therapy room. It is divided into two parts with a glass wall in the center. I have placed the sensory area on the larger half of the room and the academic area on the smaller half. It is definitely cozy, so we have to be very diligent about keeping it clutter-free and using space wisely. For storage, I have brought in a few bookshelves and melamine cabinets from home and am able to stash them in a little alcove right outside of my classroom. I'm so lucky that my administration lets me do this. Otherwise, I would be a crazy person!

My room is set off down a short hallway right off the front entrance from our school. 


We have a welcome sign to let folks know where to find me and my TA (Mrs. McBride ~ who is BRILLIANT and I couldn't live without her!)


My make-it-work-in-the-hallway storage system for social thinking/behavior tools and all the literacy materials...


Shelves for math materials...


Our awesome Playmobil school for role playing and wire drawers with stress balls, puppets, & carpet spots. Under the blue tablecloth is our makeshift kitchen (mini fridge, microwave, and rubbermaid drawers full of snacks).


Our sensory area.... we LOVE the cocoon swing from IKEA - it is so much cheaper than specialty catalogs and so great for those calm down moments we all need sometimes! I do need to pump the seat back up - a student told me yesterday that it was hurting his "leg pits". So funny! The shelves contain books, fine motor activities, visual and auditory activities, and a "cloud sand" tray.


Our yummy calm down tent & hippity hop ball. The tent is filled with a blanket, pillow, beanbag chair, and a handful of stuffed animals. The big stuffed animals are filled with beans to serve as a calming weighted item.


A computer for my Teaching Assistant and the students to share. You can see through the little doorway our academic learning area.


On the academic side of the room I have my work nook. I try hard to keep down the clutter and visual noise, but it is hard! A big goal of mine this year is to TRY to keep my desk clean. It's day 3 of school and I'm not being very successful thus far. :(


As you can see, we keep our florescent lights off and have lamps scattered around both sides of the room. It is so much more calming! Here is the work area and storage for currently-being-used materials for academics and social thinking groups. On the side of the cabinet we are trying a stamp card this year instead of a sticker chart for showing whole body listening during groups.


Here's Orlanda's Speech/Language Therapy room...


Here are the friendly guidelines for our get-together:


·  When you link up, please grab our button and include it somewhere in your post. You can find it on the sidebar. Thanks!
·  Please check out other great bloggers and leave them some comment love!
·  Please make sure that your link is directly related to a classroom tour, organizational tip, or organizational product.
·  Please join the Dynamic Duo as a blog friend. Follow us by email (on the sidebar) or through your blog reader. That way you can make sure to get the most up-to-date posts.
So, get your classroom tour ready and join the party!


May 20, 2013

End of Year Transition Issues for Kids on the Autism Spectrum


We are all counting down the days until summer break begins. Even though time off sounds exciting to both students and teachers, it can be a minefield of challenges for our kids on the Autism Spectrum. All too often those "fun" activities can create extra stress and anxiety in our students with ASD. I have a simple suggestion that makes a world of difference!

Start NOW while things are relatively sane and help your student create their own calendar for the last 3-4 weeks of school. Note all the days where there will be unusual events such as assemblies, track & field day, class parties, field trips, etc. You can also make note of all the days that are "regular" schedule days. Consider color coding the regular days. Your student will then be able to preview and plan ahead for the changes that will occur.

I usually use this calendar because it is simple and non-distracting:
 Click here to download


The week before school gets out, I send the following calendar home with students and ask their parents to help them fill it out. I know that the kids seem really excited to get out of school, but going from structured to unstructured days can create significant anxiety. I explain to parents that it is helpful to help their child structure their first week of summer and that they will likely experience a more peaceful start to their vacation.

Click here to download
I hope you find these tools quick and easy to use with your students with ASD.  ~Kelley

May 13, 2013

Fun Ways To Develop Keyboarding Skills This Summer!

I have several families who have asked about increasing their child's familiarity with letter location on a computer keyboard. Typically before having a child do more of their writing on the classroom computer or considering assistive technology options for fine motor/handwriting difficulties, it is important for students to be familiar with the keyboard and be able to quickly locate keys. Hunting and pecking is fine, but needs to be able to be done pretty quickly in order for it to be a help and not a hindrance for students.

I've encouraged the families for whom I would like to consider assistive technology for their child next year to have their child practice keyboarding using fun, free online games this summer and to practice keyboarding by emailing a friend or relative this summer.

If you have students who need keyboarding practice, here is a list of great (free!) online resources for keyboarding games:

 This site has excellent instruction as well as games. The section under "courses" is unfortunately dull, but good to do if you can get your child to work on it for 5 minutes or so. The section under "games" is fun and good practice. 


I hope this will save you some research time if you have students who need keyboarding practice. Here's to counting down the days 'til summer! ~ Kelley


May 3, 2013

Hands-on Lesson on Using Your Filter by Kelley

Here's a quick hands-on lesson to illustrate the concept of using your verbal filter to keep the group feeling calm.

We define what a thought is...


We use thought bubbles and various pictures to identify main topics group members like to think about.


We then discuss the idea of "smooth" vs "prickly" thoughts and comments. Smooth thoughts and comments are those that keep the group feeling calm and keep the interaction moving forward. Prickly thoughts and comments are those that make others feel uncomfortable and stop the interaction. Here's the visual that we use for prickly and smooth interactions. You can download it here.


We pass around a smooth ball and a prickly ball to further reinforce the concept of which was more comfortable.


After reviewing the smooth vs prickly concept, we define what a filter is and why we use filters in our communities (coffee, cleaning water, etc). We then introduce the idea of a brain filter that keeps prickly thoughts in our heads and allows smooth thoughts to be verbalized.

You'll need a container, a pitcher of water, a strainer, food coloring, a bag of small sticks/rocks/mulch, and small strips of laminated paper with a sharpie marker.


We ask the group to decide on a color that will represent smooth thoughts. This was a minefield of negotiation and group decision making in itself! Finally, they came to the decision that they would use blue food coloring to represent smooth thoughts.

We mix up the blue water in the pitcher and then identify various prickly comments that could disrupt an interaction and cause prickly thoughts in others. We write them down with a sharpie on laminated strips of paper and added them along with the sticks (which represented other prickly comments or behaviors such as turning away when a peer is talking or interrupting) to the water pitcher.

We then pour the contents through the strainer (representing our brain filter) to model keeping the prickly comments in our heads and letting the smooth comments be expressed.


I hope that you'll find this activity to be helpful in your social and speech groups!

March 2, 2013

Feelings and Emotions ~ Literacy, Language and Social Communication Activities ~by Orlanda

Whew! It's been a while since I have posted, but Kelley and I have been working HARD in our speech and special education classrooms and trying to balance work life and home life! We have spent the last few weeks with a focus on FEELINGS and EMOTIONS with many of our students. We have been using the Emotions Cue Card created by Kelley in all of our sessions to help our students identify their own emotions at the beginning of each social group session. We have found that some of our students have difficulty describing their own emotional state, so we talk about it every week!

Kelley and I work together with a wide variety of students with language, social communication and social behavioral needs and this topic is ongoing for all of these students. In addition, I work with many students with language impairments that have difficulty describing feelings as it relates to others or characters in stories that are read and heard as well as in their own oral and written expression. So, in addition to the groups that we teach together, I have been working on this skill with ALL of my groups. I even managed to incorporate many articulation goals with this lesson, here's how I did it....

We started in our social groups and speech/language groups reading these stories:


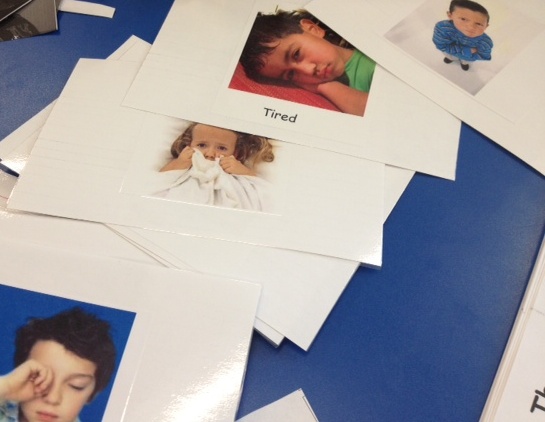
The Way I Feel was great with ALL of our young age groups (3 year olds-2nd grade students). It was easy to modify the language throughout the story and match emotions pictures. Today I Feel Silly & Other Moods That Make My Day was was great for students Kindergarten through 2nd grade because it had more words and more details in the pictures throughout the story. How Are You Peeling? Foods with Moods was a little too "abstract" for my younger students to recognize the feelings or emotions depicted in the photos, but it was great for my 1st and 2nd grade students. While we read each of these books, we had the Emotions Cue Card handy to match feelings from the book to the photos on the cue card. Additionally, I collected many other Emotions Photos to match feelings and emotions throughout these stories. Several of our students have difficulty understanding and seeing that people depict similar emotions in slightly different ways, so we wanted to offer a variety "faces" for our students to help them see and understand the similarities/differences between faces and feelings. Here is one page of the Emotions Photos that I used for my students to match and describe emotions.


This Emotions Photos document is 4 pages of photos depicting Happy, Sad, Mad/Frustrated, Calm, Scared and Tired. You can grab it here. I turned these photos into cards by cutting the pictures out and laminating them onto large index cards.


While reading all of the Feelings books, we targeted goals such as Answering Basic Questions, Describing details in pictures and using Inference to determine the character's feelings. Each time we read the books, we used the Emotions Photos to match the feelings of the characters. For students in articulation therapy, we continued to use these books and activities and were able to focus on phonemes such as /f, s, sm, sk, l/ to name a few.

After reading each of the stories (over 2-3 sessions), we started making our own book of feelings. With our young kindergarten group, we have several students with low receptive/expressive language skills and poor social communication skills. In this group, we have targeted each emotion in our own book in 1-2 sessions. We started each "emotion exploration" using a computer software program called Faceland.


We LOVE this program because it teaches the students what "clues" to look for on faces to determine the emotion. Each new emotion that is taught is broken into 2-3 facial cues from the eyebrows/forehead, eyes, and mouth. This program also allows the students to see the same emotion depicted in slightly different ways between different people. There are also questions that it asks, and the students have to match the situation to the emotion. For our young students, we often have to act/draw out these questions to help them understand; however, it really helps them learn the feelings. There are even follow up games that go along with each emotion, so it is very engaging!

After going through Faceland, we started making our own book called "My Book of Feelings". Here are some sample pages from this book:


We took pictures of our students depicting the emotion that was stated on each page. This was easiest to do during our Faceland activities for some of our students. Others just needed the Emotions Cue Card or Emotion Photos and a mirror to match their own faces to the feelings. Some students enjoyed taking their picture using the iPad with the camera in "reverse" mode so that they could see themselves making the faces. Still, some of our youngest students (3 year olds) had a hard time making the faces that they were not feeling in the moment, so we improvised by using other pictures or catching them in the act! Needless to say, this was one of the most fun parts of the activity, and all of our students LOVE seeing pictures of themselves in their own books! Here is how one turned out!


Our students with expressive language impairments had some difficulty independently coming up with "things that make me feel ___" so I created a document with pictures for the kids to choose from. A sample of this document is pictured, but you can grab the entire document HERE.


We also found that different students had different feelings about the pictures offered. For example, one of our students feels HAPPY when tying her shoes but another said that this made him feel FRUSTRATED because it was hard for him.

For our youngegst students, we also used the Emotions Photos cards to discuss Similarities and Differences and the "I Feel __ When" cards to Categorize emotions. For our older students in speech/language therapy, we continued expanding this lesson by coming up with synonyms for the feeling words and using them to re-tell or create stories of our own. In their Book of Feelings, we made it harder by having them expand their own stories with their personal experiences.

This has been a great activity for ALL of our students. We have had the opportunity to learn so much about them and they have really improved their ability to describe their feelings and the feelings of others. AND, they will be able to share their books with their families for ongoing conversations at home!

We hope you find these activities useful with the speech, language, and social communication needs of your students! We'd love to know How You Feel about these activities and how we can make them even better!

   ~~Orlanda